A step-by-step guide on how to replace a bearing in a Samsung washing machine with your own hands
 Although Samsung washing machines are considered the most reliable and durable in operation, after several years of trouble-free operation, breakdown can still occur.
If a bearing fails, repair is required. Cope with it on your own is difficult, but possible.
How to replace a bearing in a Samsung washing machine with your own hands, read the article.
Content
When is it necessary to change?
Signs that indicate the need replacement of bearings:
 During washing, a metallic grinding, creak and crunch is heard. The faster the engine spins, the louder these sounds.
- The machine does not wring out things well, they remain wet.
- The device vibrates violently.
- The gum of the seal is erased.
With broken bearings, the machine will not be able to work properly, so replacement parts are required.
How to remove and replace with a new one?
To replace bearings yourself, you must strictly follow the instructions, following the sequence of actions. You need to stock up on tools and patience in advance., since the work is difficult and time-consuming.
Training
A broken bearing cannot be repaired, it can only be replaced. Before proceeding with this procedure, you need to purchase a new part.
To carry out the work, the following tools are required:
- small hammer;
- grease, such as WD-40;
- hex key;
- metal hairpin;
- pliers;
- adjustable wrench;
- marker;
- screwdriver;
- sealant.
This kit is required for DIY repair.
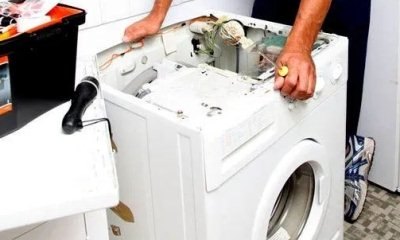
Parsing the Samsung typewriter
Disassemble the washing machine according to plan. In order not to get confused in the details and their location, you can record the whole process on a photo or video camera.
Procedure:
-
 Remove the top cover. To detach it from the case, you need to unscrew 2 screws located on the back of the device.
When they are unscrewed, the lid is taken with two hands and pulled towards you, and then up.The removed panel must be removed to the side so as not to spoil it during work.
- Remove the powder applicator. To do this, the tray must be pulled towards you as far as it will go, then press the middle valve.
Holding it in this position, carefully lift and pull the tray with the other hand. With the correct sequence of actions, it will jump out.
- Water supply hoses and a branch pipe lead to the receiver, which is designed to fill soapy water into the tank. They are fixed with clamps that must be released. For this, pliers are used. If done correctly, the receiver can be detached and stowed away.
- Next, you need to deal with the counterweight. It is located above the tank and looks like a stone, which is fastened with bolts. They need to be unscrewed with a screwdriver. Do this as carefully as possible, holding the counterweight. It is very heavy and must not be dropped. The dismantled part is removed to the side.
- The next step is to remove the rubber cuff. To remove it, you need to unscrew the bolts securing the hatch lock. In order not to violate the integrity of the wiring, remove the sensor. Use a thin screwdriver to pry the clamp, the tool must be guided until it rests against the fasteners. When the found bolt is loosened, the clamp can be removed. Pry the cuff with your fingers and gently pull it out, acting in a planned manner, around the circumference.
- To unscrew the bottom of the washing machine, lay it on its side. The bottom is fixed with 4 bolts. The removed cover is removed to the side.
- Disconnect the wires from the drain pump and engine. In order not to get confused during the assembly, you can take several photos, or mark all the wires and parts to which they are attached. There is no need to remove the pump itself, only the motor is removed.
- The next step is to remove the racks. Without them, it will not be possible to get to the bearing. They are screwed to the tank and to the body of the washing machine. They need to be unscrewed.
- The wire connected to the valve sensor is removed, then the bolts with which it was fixed are unscrewed. The valve is set aside, after which the springs on which the tank hangs are disconnected.
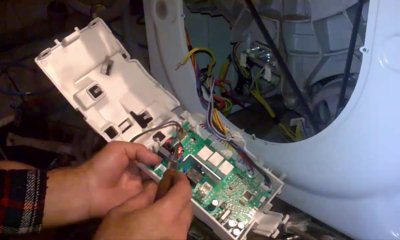 The tank is practically free, all that remains is to remove the wall and the front cover. The wall is held by 10 bolts, they need to be stamped and unscrewed. Another small counterweight is hidden under the front cover; it is also dismantled.
- Remove the control panel carefully, taking care not to damage the wiring. Now you can get the engine and tank.
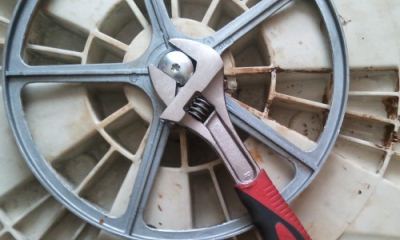
When he is free, they turn him over, throw off the belt, unscrew the pulley. To do this, you need to use a hexagon.
Sometimes it comes off very tightly, but for this, WD-40 grease was stored in advance. It is impossible to twist a hard-going bolt, there is a risk of breaking the thread. This completes the work on disassembling the washing machine.
You need to work with wiring carefully... It is weak, so it can be easily damaged. Do not bend or twist the wires. If burnt contacts or broken units are found, they are immediately changed.
Removing a part
The tank removed from the washing machine must be disassembled into 2 parts: into the upper half with a hatch in the central part and into the lower half with a heater. The drum and axle should remain separate from them.
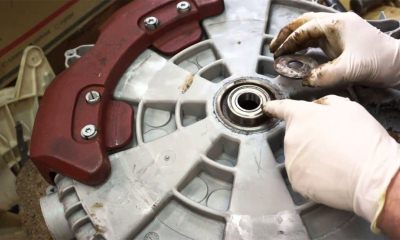
Remove the bearing before replacing it. Procedure:
 There are 2 bearings in the tank sleeve. One is big and the other is small.
- To get a large bearing, you need to knock it out from the outside towards the tank. It is recommended to use a hairpin for this. The small bearing, on the other hand, is knocked out from the inside of the tank.
- The hairpin is attached to the edge of the part and lightly tapped on it with a hammer, then it is rearranged to the other edge and the procedure is repeated. Thus, you need to systematically process the entire bearing until it flies out.
You should not hit the same place twice. There must be at least three points of force application. Otherwise, the bearing will come out crooked, or it may get stuck in the bushing. This will complicate dismantling.
If on your own it was not possible to remove the bearing from the tank, you can contact the locksmiths... Workshops and garages have the necessary equipment to safely remove the part. The price for such services is minimal, as a rule, even 100 rubles is enough, but you will have to carry the tank yourself.
Mounting
After the old bearings have been removed, the oil seals must be removed. Use a clean soft cloth to wipe the sleeve from the inside. The seals themselves are lubricated with a special agent that comes with the kit, after which they are installed in place.
The next step will be installation bearings:
- the part is inserted into the sleeve and with your fingers is pushed into it;
- a wooden block is placed on the larger bearing;
- from above on the bar hit with a hammer;
- the procedure may need to be repeated several times until the bearing is in place.
Assembly and inspection after repair
 After installing the bearing, you need to assemble the washing machine by performing all the steps in reverse order.
Before closing the back cover, it is necessary to check the operability of the device. It is turned on and washed in several modes..
In this case, you need to arm yourself with a flashlight and check for water leaks. If everything is in order, the lid is returned to its place and continue to use the washing machine further.
Video instruction for disassembling the Samsung washing machine and replacing the bearing:
How much does it cost and where to buy the part?
A bearing for a Samsung washing machine can be purchased in a company store, or in specialized departments, which are even in small towns. Another option is to order bearings online. Their average cost is 600 rubles.
Possible difficulties
 If there is no experience in repairing washing machines, or it is not enough, then you can face a number of difficulties, including:
- broken wires;
- ruptured cuff;
- breakage of the pulley when removing it from the axis;
- breakage of the bolts on which the parts are attached;
- breakage of pipes;
- deformation of the bushing during bearing removal.
To avoid such troubles, you need to act carefully, applying a minimum of effort. Otherwise, the damaged part will have to be replaced. If the wires are inexpensive, then if the sleeve breaks, you will have to buy a new drum.
The price of the master's services
The process of replacing bearings is quite complicated, so most owners of Samsung washing machines turn to a specialist for help. The cost of work starts from 3 300 rubles, excluding the cost of the part.
The technician may take 1 to 4 hours. The average warranty period of the replaced spare part is 1 year.
Find out more about repairing Samsung washing machines in this section.
Conclusion
Replacing a bearing in a Samsung washing machine is a difficult task, you can cope with it on your own if you strictly follow the instructions and do not violate the procedure. In this case, the entire repair will cost no more than 600 rubles.
If you do not have the necessary skills, then it is better to contact a specialist, but the master will have to pay a lot more.


