A matter of technology, or how to disassemble a Samsung washing machine with your own hands
 Samsung washing machines are reliable and durable household appliances, but appliances that would never fail simply do not exist.
If a breakdown occurs, parts must be replaced, and for this, the Samsung washing machine must be disassembled.
Read about how to properly disassemble and reassemble a Samsung washing machine in the article.
Content
Preparation for disassembly
Before proceeding with the main procedure, you need to perform several preparatory activities.
They include 3 main stages:
- Remove the device from the bathroom, as it is very difficult to disassemble it in a narrow room. In addition, the room should be well lit. The place of the upcoming work must be covered with rags or newspapers so as not to spoil the floor covering (if the work is planned to be carried out in the apartment).
- Prepare tools.
- Prepare the device itself for the upcoming repair.
To completely disassemble the washing machine, you will need the following set of tools:
 screwdrivers or screwdriver;
- wrench and hex wrench;
- pliers;
- multimeter;
- a hammer;
- colored markers;
- grease WD-40;
- sealant;
- rag.
Sometimes it becomes necessary to cut the tank, for example, to gain access to the crosspiece. In this case, you cannot do without:
- hacksaws,
- drills,
- drill,
- screws and bolts.
Preparing the machine itself involves going through the following stages:
- Disconnect power to the device. It is unacceptable to disassemble the machine connected to the mains.
- Disconnect the water inlet and outlet hose.
- Remove the drain filter and drain the water in it. If it is dirty, it can be cleaned.
- Place the device in a convenient place.
After all the preparatory work is completed, you need to study the diagram of the washing machine. You can learn about how the Samsung washing machine works from this articles.
Samsung washing machine diagrams
Samsung washing machine diagrams may have slight differences, depending on the model. However, the general components are always the same. The diagram is shown in the figure:
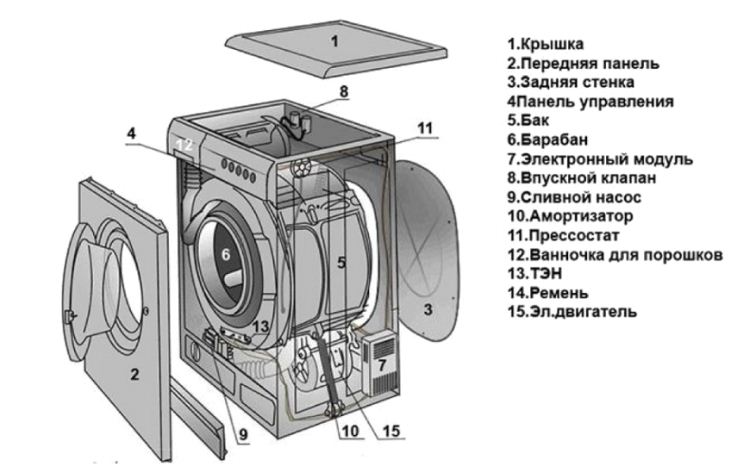
Essential elements Samsung washing machines:
- the front panel, rear wall, top cover and bottom of the appliance are all fixed with bolts;
- pull-out tray for detergents;
- panel with programs;
- drum, clutch, tank;
- counterweights - most often there are two of them, they are located at the top and bottom of the washing machine;
- engine;
- springs;
- pump;
- Heating element;
- pressure switch.
In addition to the basic circuit of the washing machine, there is also an electronic circuit that is useful when checking the integrity of wires and assemblies... It is shown in the figure:

Process features
Depending on the type of load, the methods of disassembling the washing machines will differ. If the procedure is performed for the first time, you must strictly follow the instructions so as not to damage the device.
Front-loading automatic machine
You need to start disassembling by dismantling the top cover. To do this, unscrew 2 screws that are located on the back of the device. The lid is pushed back 15 cm and raised.
Further algorithm of actions:
- Dismantling the hopper and control panel. First you need to remove the detergent dispenser hopper. To do this, press the latch located at the base of the hopper and pull the container towards you again. It will come out easily, you don't need to make any special efforts. Behind the hopper, you can find fasteners holding the control panel. They are unscrewed: there are 2 screws in front and 1 screw on the right. Separate the panel with a screwdriver by prying it from the left side.
- Removing the front panel. It must be pulled at the bottom edge to release it from the top latches. Then the panel is gently pushed towards itself, but without sudden movements. Behind you can find many wires, you need to pull them out one at a time, snapping off the latches.
- Removing the bottom panel. It is secured with 3 latches. It is convenient to pry it off with a slotted screwdriver by inserting the tool into the existing slot. First, it is pushed back in the center, and then along the edges, after which the panel easily comes off.
- Removing the front panel on which the door is located. It is fixed with 2 screws from the bottom and 2 screws from the top. They are unscrewed. As a result, the panel will be held by small hooks.
-
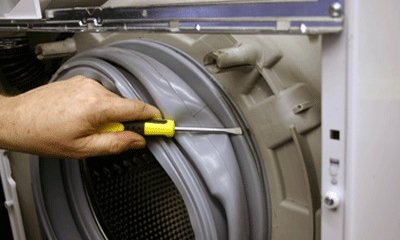 Removing the seal. If you open the door, you will find that it is connected to a rubber part. The cuff retaining ring is picked up with a flat screwdriver and pulled slightly towards you.
Behind it will be a spring-shaped metal clamping clamp. You need to find its latch and open it with a flat screwdriver.
Then she passes it around the entire circumference of the ring to disconnect it. Handle the tool with care. Otherwise, the torn cuff will have to be replaced.
- Removing the rear panel. This process is not difficult. It is enough to remove the 4 self-tapping screws with which it is screwed.
- Disconnecting the hoses. They lead to the machine tank (inlet and outlet), to the pressure switch and to the powder chute.
- Disconnecting the wires leading to the heating element and the temperature sensor. The heater itself is located in the front lower part of the tank, under the drum. To remove it, you need to unscrew the nuts. After that, the heating element will easily come out of the nest. When removing the wires, you need to mark their location with colored markers.
- Removing counterweights. There are 2 of them in the washing machine: above and below the tank. They are fastened with bolts. Since the loads are heavy, they must be removed carefully.
- Help is needed to remove the tank. It is difficult to cope with one pair of hands. First you need to disconnect the shock absorbers, and then carefully remove the tank from the springs and pull it out. After that, the belt and motor are removed. Finally, the pulley is dismantled by unscrewing the middle bolt. If it is rusted, it is lubricated with WD-40.
- There are bearings inside the drum. To remove them, the tank must be disassembled. If it is soldered, it is sawed with a hacksaw. This process is very laborious and not all masters undertake such work. In this case, it is easier to purchase a new drum. Provided that the tank is collapsible, replacing the bearings will not be difficult.
With vertical
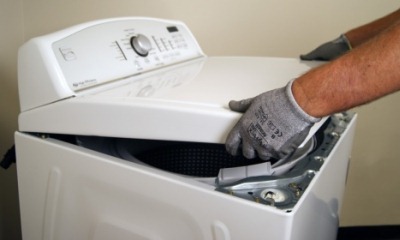 Disassembling a top-loading machine is more difficult. Such devices are rare in Russia.
The procedure is as follows:
- unscrew the screws located on the sides;
- move the block to your side;
- disconnect all wires;
- remove the panel of the washing machine.
Further analysis of the device is carried out according to the same type as that of a front-loading washing machine: remove the tray, panels, clamp. The process ends by removing the drum, replacing or repairing defective parts.
How to assemble?
Assembling a Samsung washing machine is not difficult if you shoot all the actions in the photo. Installation is carried out upside-down.
Be sure to fix all wires and hoses... When screwing on the parts, you need to check that they do not dangle, but are securely attached.
Possible difficulties
While disassembling the washing machine you can face the following difficulties:
 Broken wiring. When working with wires, you need to be careful, as they are very fragile. If a break occurs, replace the damaged element.
- The integrity of the cuff has been compromised. To prevent this from happening, you cannot try to remove it with sharp parts, for example, with a knife. Use a screwdriver carefully.
- Bolts have broken. If it is difficult to unscrew them, you must resort to the help of WD-40.
- Broken pipes or pulley.
To avoid minor troubles and additional expenses, you need to disassemble the washing machine carefully, slowly and trying not to damage the parts.
All about the repair of Samsung washing machines - in this section.
Related videos
How to disassemble a Samsung washing machine, video instruction:
Conclusion
Parsing a Samsung washing machine is not an easy task, but you can cope with it if you approach the matter responsibly.
The sequence of actions should not be disrupted, to clarify the location of the parts, you need to use the diagram. The whole process of work must be recorded, so that later you can easily assemble the device.


